Showing posts with label ULTA. Show all posts

Friday, October 11, 2013

Review + swatches: Urban Decay Vice 2 eyeshadow palette

Happy weekend!! Hope you all had a great week.

To celebrate a weekend of relaxing (and playing with makeup apparently), I picked up the limited edition Urban Decay Vice 2 eyeshadow palette ($59) at ULTA.

After eyeing it for weeks, I just gave in.

Although this palette is a tad pricier than the Urban Decay Naked palettes ($52), I felt it was justified when I swatched the shadows in store! Wow. More on that in a bit.

Plus the Vice 2 comes with 20 shadows vs. 12 in the Naked palettes.

Anyway, can we just quickly mention... This. Packaging.

It's so pretty and STURDY. So basically, it's PURDY.

Purples have been screaming my name lately (must be a fall thing), so this packaging, of course, made it all the more appealing.

You push the button pictured (that says Urban Decay), and the palette slowly opens. It might as well have a light shining down on it. It's THAT beautiful.

Now onto the shadows themselves.

Ahhhhh... divine.

This palette comes with 20 exclusive shades. It does come with 8 more shadows than the Naked palettes, but they are 0.03 oz compared to the 0.05 oz of Naked.

But for now, I'm OK with that.

I swatched 10 shadows on my left arm at a time. They are buttery and some are EXTREMELY pigmented. Others not as much. But I'm LOVING them overall.

Out of all the shadows, I'd have to agree with other reviews about Lovesick NOT swatching well. As you can see in the photo below, it just doesn't look that great. Dry and patchy.

Everything else in the first 10 shadows are amazing, especially the metallics on the far right. That silver, though I don't know what to do with it yet, is SO pigmented.


As you see (or NOT see) in the 2nd half, Habit is invisible... or so it seems. It's a light nude matte, pretty much like Naked in the Naked Palette, so it just completely blended into my skin.

The shimmery shadows like Stash, Betrayal and Ambush are especially pigmented and gorgeous.


Here's a full description of each shadow based on the Urban Decay website:

First half
--Smokeout (dark taupey-black satin)
--Prank (deep navy matte with turquoise floating pearl)
--Radar (metallic brown shimmer with iridescent micro-glitter)
--Dope (warm champagne satin)
--Lovesick (black matte with iridescent micro-glitter)
--Madness (bright metallic blue shimmer with blue micro-glitter)
--Damaged (bright metallic emerald shimmer)
--Toxic (metallic copper-pink shimmer with tonal micro-glitter)
--Shellshock (bright metallic silver)
--Strike (antique gold shimmer with silver micro-glitter)

Second half
--Voodoo (metallic purple shimmer with iridescent purple micro-glitter)
--Habit (light nude matte)
--Coax (medium metallic pink with golden iridescent micro-sparkle)
--Stash (deep olive green shimmer with iridescent micro-sparkle)
--Betrayal (bright purple satin with blue shift)
--Ambush (metallic brown satin)
--X-Rated (baby pink satin)
--Poison (charcoal satin with iridescent micro-sparkle)
--Derailed (medium metallic taupey-brown shimmer)
--Rewind (medium brown matte)

The palette also comes with a dual-ended shadow brush and BIG mirror that takes up the whole top half of the case.

If you were on the fence about getting this palette, I hope this review was somewhat helpful! And if you didn't even consider it before, it may be a good investment to consider!

Seriously, I'm seeing this palette taking me far with so many different looks. Can't wait to play.

Thanks for reading!

For more beauty and lifestyle posts, please subscribe or "follow by email" on the top right hand corner of the page. I'm also on Instagram @erisaxo.

Monday, October 7, 2013

Review: Freeman Facial Clay Mask Mint & Lemon

Hi there! Happy Monday/almost Tuesday.

I'll be honest -- I felt quite tired today; anyone else?

Hate when that happens even after a weekend! And since I felt like doing nothing after work but put on a face mask and relax... I decided to do a little research.

I don't use masks often or a scrub, for that matter, like I used to. Just when I get facials every two months. (Boy, has this turned my skin around!)

At home, I use a Glycolic Acid moisturizer at night and figured that's more than my sensitive skin can handle.

BUT... today, I really wanted a pick-me-up.

On MakeupAlley.com, one mask that stood out for me was the Freeman Facial Clay Mask Mint & Lemon.

RAVE reviews!

I had purchased another Freeman mask earlier this year (Facial Revealing Peel-Off Mask Pomegranate), so I felt comfortable trying out the Mint & Lemon version.

Oh my goodness, more than the peel-off mask (which I liked but was hard to peel), I think this CLAY mask is what my skin has been needing!

It makes sense -- I should've known. I have extremely oily skin that's prone to breakouts. That's exactly what this mask targets.

I love the consistency of the mask. I applied an even layer (not too much) all over my face and left it on for 20 minutes. It smells nice and not overly minty.

It dried nicely (to the point I couldn't move my face whatsoever) and I rinsed it off with warm water. I then washed my face with my usual cleanser and followed that up with a toner and moisturizer.

My skin looked GREAT! No redness and very even. My face was clean, calm and soft. I don't know how much tighter my pores really look after one use, but hopefully this mask will help over time.

So I gotta say... if this mask continues to deliver without giving me problems (who knows? Breakouts or something), this could become my holy grail mask.

The only down side is the parabens, so this isn't a perfect mask. But it otherwise delivers!

Plus it was BOGO FREE at ULTA today. This is perfect because I have a feeling I'll be using it all.

They are BIG tubes, too -- 6 fl. oz. for $4 (actually, $2 each with the sale). $4 is already a great deal, but $2?! AMAZING.

In the reviews, I also read some people use this mask as a spot treatment. I will have to try that out.

Later on, I'll try to come back and add an update to this post to see if I still like it.

If you have oily skin like me, please check this out! And let me know in the comments what masks you recommend.

I may make this a Monday ritual, so Mondays don't seem so bad. Mask Mondays! Who's with me?

For more beauty and lifestyle posts, please subscribe or "follow by email" on the top right hand corner of the page. I'm also on Instagram @erisaxo. Thanks for reading!

Sunday, September 29, 2013

Fall 2013 nail color idea: OPI Wooden Shoe Like to Know


Hi there! More fall nail picks... I've been looking for a great milk chocolate brown polish for fall.

OPI's Wooden Shoe Like to Know ($9) is a nice brown, but it's not what I've been searching for. It's more of a dark chocolate with a purple tone.

Either way, it's still pretty so I wanted to blog about it.


It has very, VERY subtle gold shimmer. It's not really evident on my nails, actually.

Wooden Shoe Like to Know went opaque in 2 coats, and it wasn't streaky at all.

I topped it off with Seche Vite.

Ulta has a 2 for $15 sale this week for OPI, so I may try out a couple more.

Please let me know what polish you're loving lately. I'd love some recommendations. Thanks for reading!

For more beauty and lifestyle posts, please subscribe or "follow by email" on the top right hand corner of the page. I'm also on Instagram @erisaxo.

Saturday, September 7, 2013

OPI Lost on Lombard: Review + photos (San Francisco Collection)

It's not quite fall yet, especially in Phoenix with the 110+ degree heat, but I'm ready for the next season to arrive!

To get in the mood, I've been thinking about fall nail colors. I'll review some in the coming weeks, so hopefully, it can give you ideas for your next polish purchases.

My first dark polish of the season is OPI's Lost on Lombard ($9) from the San Francisco Collection, the brand's 2013 fall and winter lineup.

This polish is beautiful and easy to apply. Not streaky at all, and this is why OPI is my favorite.

With just one coat, it was opaque. But to make sure it was nice and rich, I added another coat. (I wait several minutes between coats to make sure I don't end up with bubbles.)

There's no shimmer. It's just a deep, deep red/burgundy, which I love for the cooler months. (My favorite summer red is OPI's Cajun Shrimp.)

Then I topped it off with my usual Seche Vite.

I highly recommend this polish to get you in the fall mood!

Score: 5 out of 5

For more beauty and lifestyle posts, please subscribe or "follow by email" on the top right hand corner of the page. I'm also on Instagram @erisaxo.

Sunday, August 25, 2013

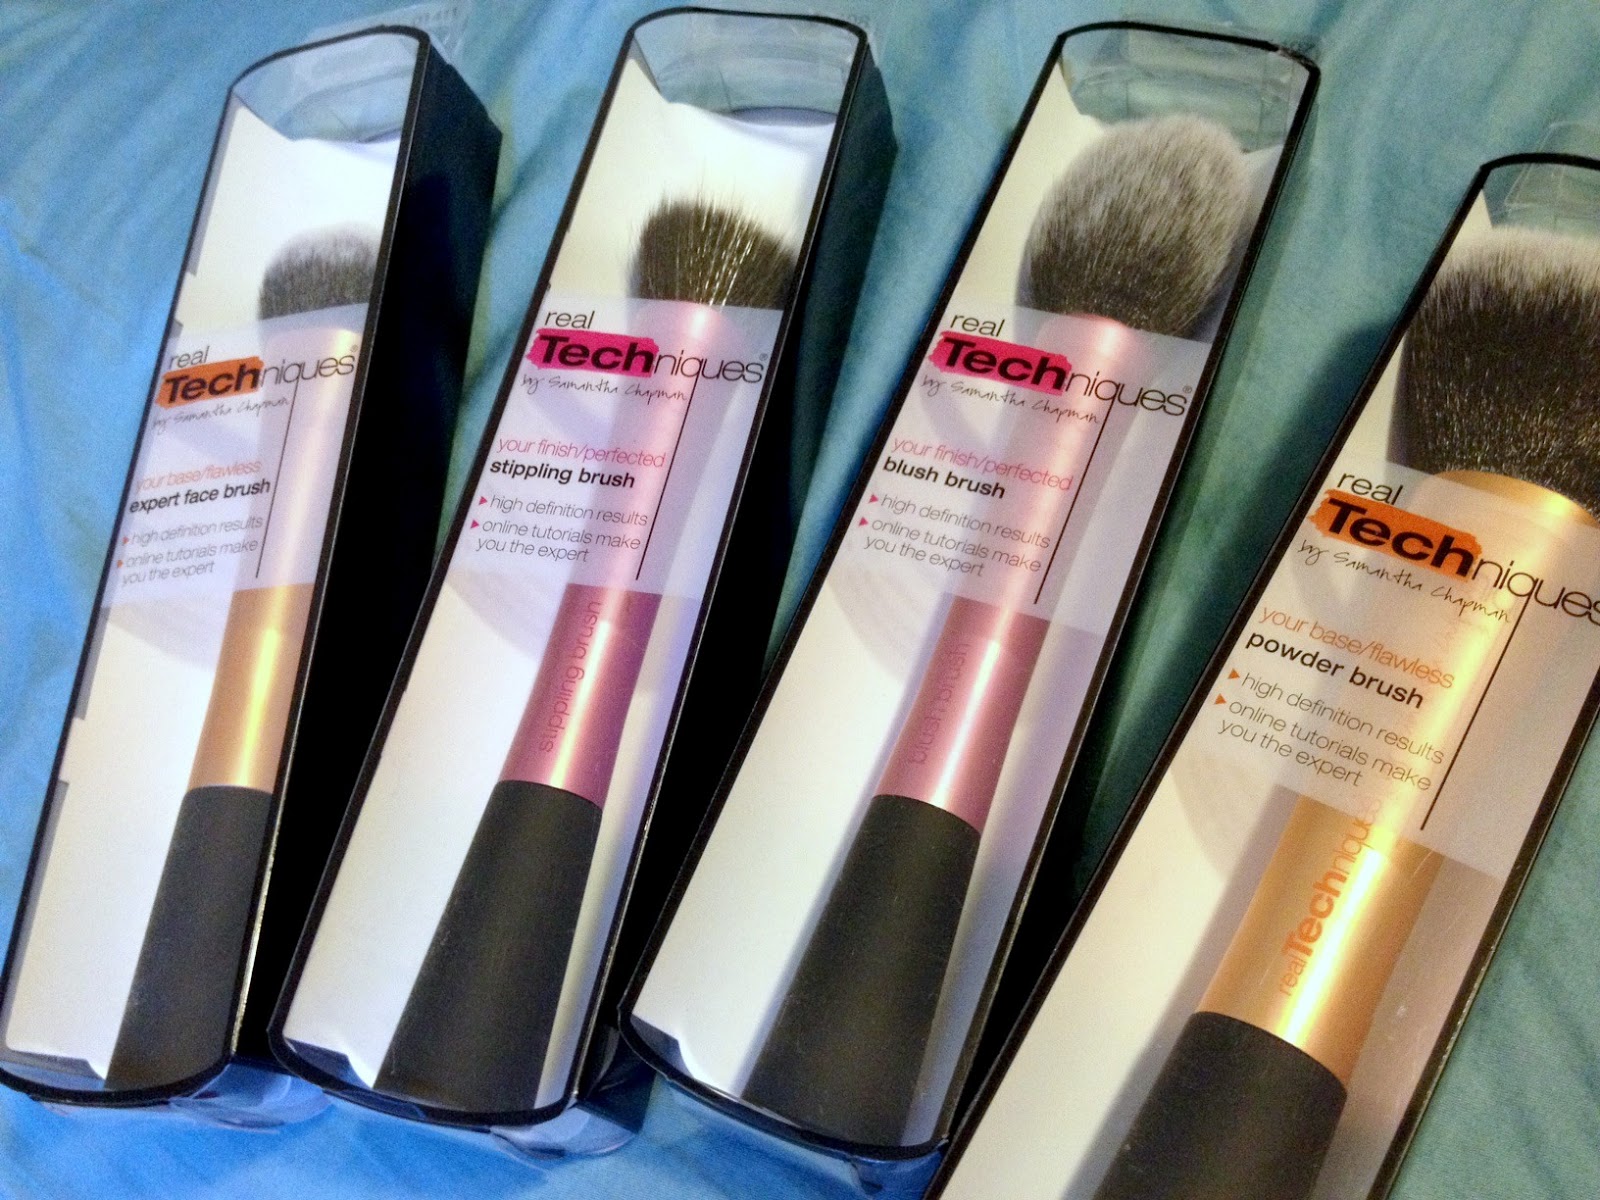
Best makeup brushes: Real Techniques review

After trying them out for just over two months, I can wholeheartedly say I LOVE Real Techniques brushes!

Samantha Chapman's line of makeup brushes is fantastic, affordable and high quality.

I don't have all the brushes... I think I just have 8 of them, but I think that's a pretty good number to rate them.

Here's my Top 4:

--Expert face brush ($9): This one is my absolute must-have. I use this brush to apply my foundation or BB cream (which is the only thing I've been wearing lately!) and I dab my under-eye concealer in with this as well. It's sturdy, dense and very easy to wash. I used to use a Clinique foundation brush that got really gross, even after washing it. This one is a third of the price and so much better. It's amazing when you're looking for more coverage and it doesn't leave my makeup streaky. If you're going to try one Real Techniques brush, I recommend this one.

--Powder brush ($10): Love, love, love this brush. It's a really big, super soft brush that I could sweep across my face all day. It's that soft. I use this to set my makeup with a powder. I, again, used to use a Clinique brush for this, and the Real Techniques brush is a lot bigger and softer. And so much more affordable.

--Blush brush ($9): I use this one for two things - applying blush and blending away any harsh lines on my face. At first, I didn't like this one for blush (I thought it was too large), but I've been using it this way for the last couple weeks. It picks up just the right amount of product and allows me to build the color. Otherwise, I love using this one to blend my bronzer and blush into my skin, so you can't tell where the product is starting or ending. The worst thing is going out and then realizing that my bronzer is very harsh, too obvious and just odd. I prefer the subtle look! For a flawless face, BLEND BLEND BLEND!

--Contour brush (only available in the Core Collection kit for $18): This is the perfect size brush for applying highlighter just at the top of my cheekbones. I don't use it to contour. I've been loving the Bobbi Brown Shimmer Brick in Bronze for this.

As you can see in one of the photos, I also like my MAC brushes. But for much less money, I highly recommend Real Techniques brushes, especially my Top 4 picks!

I linked the above descriptions to Real Technique's website, but I bought them in person at Ulta. I recommend slowly building your brush collection with Ulta's amazing $3.50 off $10 coupons! Best deal around.

For more beauty and lifestyle posts, please subscribe or "follow by email" on the top right hand corner of the page. I'm also on Instagram @erisaxo.

Saturday, June 22, 2013

OPI Bubble Bath nail lacquer: Review + photos

Steering away from my usual love for bright nail polish, I've been keeping an eye on nudes.

I already have some nudes, but they tend to be a bit more beige and brown than what I've been wanting.

Here comes OPI's Bubble Bath. I've seen this swatched quite a few times with high reviews on Makeupalley.com, but I didn't go out and buy it right away.

Now that I'm noticing a ton of my stuff is bright pink and coral (clothes, accessories, etc.), I'm trying to tone it down to show that I am, indeed, an adult!

So OPI's Bubble Bath does the job and is what I'm loving right now. It brightens up my hands without going the light pink route. It's not too obvious to anyone but me, and that's OK. It also looks quite pretty on my toes!

It has more pink than other nudes, but it stays modest. It's one to sport to work, for sure.

It is a little streaky for the first couple coats, but the third coat came out really smooth for me. I also wait about 10 minutes after each coat so I don't end up with air bubbles. With the third coat, it came out opaque.

The base coat I love right now is Revlon Colorstay Longwear Enamel Base Coat and my top coat must-have is Seche Vite Dry Fast Top Coat. I'm linking to Makeupalley.com because I live by the reviews on there!

Seche Vite is a must for me because it really makes my nail colors LAST. They turn out glossy and hard as a rock. I started using cheaper ones again for a while, thinking it wouldn't be a big deal, but I realized the $10 is so worth it.

As for the OPI this time around, I got Bubble Bath and Mod About You (light pink) since ULTA has their 2 for $15 OPI sale lately. Plus I used the $3.50 off $10 coupon I love dearly, so I ended up with two OPI polishes for just over $12.

Love. It.

For more beauty and lifestyle posts, please subscribe or "follow by email" on the top right hand corner of the page. I'm also on Instagram @erisaxo.